Get Your FREE Online Quote Today! Click Here
Questions? Call: 647-355-1969 or 705-627-1725
Steps To Painting Kitchen Cabinets
Steps to Painting Kitchen Cabinets: Transform Your Space with These Tips
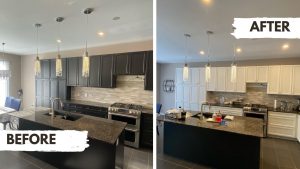
If you’re looking for an affordable way to transform your kitchen, painting your cabinets is an excellent solution. By following these steps to painting kitchen cabinets, you can achieve a professional-grade finish that breathes new life into your space. Whether you’re using a fine-finish roller for fixed pieces or an airless sprayer for cabinet doors, the right tools and techniques make all the difference.
Why Paint Kitchen Cabinets?
Painting kitchen cabinets is a cost-effective way to update your kitchen without replacing perfectly functional cabinetry. It allows for complete customization, turning outdated cabinets into a stylish, modern focal point of your home. Plus, the process is environmentally friendly, reducing waste by reusing materials.
Essential Steps to Painting Kitchen Cabinets
Step 1: Plan Your Project
- Decide on the color and finish for your cabinets. Lighter shades brighten the space, while bold colors make a statement.
- Set aside enough time for the project, as the process requires multiple steps, including drying and curing times.
Step 2: Prepare Your Space
- Clear the kitchen of any items that may get in the way, including food, appliances, and utensils.
- Protect countertops, floors, and walls with drop cloths and painter’s tape. A clean, organized workspace will make the project easier and minimize cleanup.
Step 3: Remove Doors, Drawers, and Hardware
- Use a screwdriver to take off cabinet doors, drawers, and all hardware.
- Label each door and drawer to make reassembly easy. Place screws, hinges, and handles in labeled bags.
Step 4: Clean Thoroughly
- Use a degreaser or a kitchen cabinet cleaner to remove built-up grease, dirt, and residue.
- Focus on edges and corners where grime tends to accumulate. Clean cabinets ensure paint adheres properly.
Step 5: Sand the Surfaces
- Lightly sand all surfaces with medium-grit sandpaper to remove the existing finish and create a texture for primer and paint to grip onto.
- Smooth the surface with fine-grit sandpaper for an even base. Wipe away sanding dust with a tack cloth or microfiber cloth.
Step 6: Prime the Cabinets
- Apply a high-quality, stain-blocking primer to seal the surface and prevent bleed-through from wood tannins.
- Use a fine-finish roller to coat flat panels and fixed pieces like cabinet frames.
- For doors, use an airless sprayer to apply primer evenly, ensuring a smooth finish with no streaks or brush marks.
- Let the primer dry completely before lightly sanding it with fine-grit sandpaper. Apply a second coat of primer for the best results.
Step 7: Paint the Cabinets
- Choose a durable, cabinet-grade paint in a satin or semi-gloss finish, which is resistant to moisture and stains.
- Use a fine-finish roller for fixed panels and frames, applying thin, even coats.
- For cabinet doors, spray the paint using an airless sprayer for a professional, factory-like finish.
- Allow each coat to dry fully before applying the next. Two coats of paint are recommended for rich color and even coverage.
Step 8: Inspect and Touch Up
- Inspect all surfaces carefully for missed spots or uneven coverage.
- Use a small brush to touch up tight corners, edges, or imperfections.
Step 9: Reassemble Your Cabinets
- Once the paint has fully cured, reattach doors and drawers using the labeled hardware.
- Double-check alignments to ensure everything fits correctly.
Key Tips for Success
- Use High-Quality Tools: Investing in a fine-finish roller and an airless sprayer will make the process smoother and produce better results.
- Work in a Dust-Free Environment: Dust can settle on wet paint and ruin the finish, so clean your workspace thoroughly before starting.
- Be Patient: Allow adequate drying and curing times between coats for a durable finish.
- Practice Spraying: If using an airless sprayer for the first time, practice on scrap wood or cardboard to perfect your technique.
Steps to Painting Kitchen Cabinets
Painting your kitchen cabinets is a rewarding project that can dramatically enhance the look of your kitchen. By following these steps to painting kitchen cabinets, you’ll ensure a smooth, durable finish that lasts for years. Using tools like a fine-finish roller for fixed pieces and an airless sprayer for cabinet doors is key to achieving professional-quality results.
If you’re unsure about tackling the project yourself, hiring a professional cabinet painting service can save time and guarantee a flawless finish. Ready to transform your kitchen? Start today and create the space you’ve always dreamed of!
Get your easy and FREE online cabinet painting quote today! Click Here
TESTIMONIALS
I was extremely pleased with the services I received. Frank & his team at paint my cabinets were great! Trustworthy, reliable and professional! I would highly recommend this company and intend to use them again in the future!
Rose Erman
These guys were great! They quoted me at an unbelievable affordable price and did an amazing job! They were on time, clean, courteous, and professional. I highly recommend this company to anyone looking for a cabinet painter.
Lilian Melo
They did an awesome job. Fast, friendly, neat, cleaned-up well, and at a fair price. I'd highly recommend them.
Braeden Hay


