Get Your FREE Online Quote Today! Click Here
Questions? Call: 647-355-1969 or 705-627-1725
Painting Oak Wood Cabinets
Painting Oak Wood Cabinets: A Step-by-Step Guide
Painting oak wood cabinets is one of the most effective ways to modernize your kitchen or bathroom without the expense of replacing your cabinetry. Oak cabinets are sturdy and long-lasting, but their prominent wood grain can feel outdated in modern spaces. With proper preparation and tools like fine-finish rollers for panels and fixed pieces and airless sprayers for doors, you can achieve a professional, smooth finish that transforms your space.
Why Paint Oak Wood Cabinets?
Painting oak cabinets allows you to refresh your space without the high cost of cabinet replacement. It’s a cost-effective, eco-friendly way to customize your kitchen or bathroom and give it a contemporary appearance.
- Cost Savings: Painting is significantly less expensive than replacing or refacing cabinets.
- Custom Colors: You can choose from endless colors and finishes to suit your design preferences.
- Sustainability: Painting allows you to reuse sturdy oak cabinetry while minimizing waste.
Challenges of Painting Oak Cabinets
Painting oak wood cabinets requires careful attention to detail due to the natural grain and texture of the wood. Oak’s grain can remain visible after painting, but this can be minimized with proper preparation, such as sanding and using grain filler. Additionally, achieving a flawless finish requires using the right tools for different parts of the cabinets.
Step-by-Step Guide to Painting Oak Wood Cabinets
Step 1: Gather Your Supplies
To get started, you’ll need the following:
- Degreaser or cabinet cleaner
- Sandpaper (medium and fine grit)
- Wood grain filler (optional)
- Painter’s tape
- Drop cloths
- High-quality primer (stain-blocking or shellac-based)
- Cabinet-grade paint (semi-gloss or satin finish)
- Fine-finish roller
- Airless sprayer
- Paintbrushes for touch-ups
- Screwdriver and labels for hardware
Step 2: Remove Doors, Drawers, and Hardware
- Remove all cabinet doors, drawers, and hardware with a screwdriver.
- Label each piece and its corresponding location for easy reassembly.
- Store hardware in labeled bags to keep everything organized.
Step 3: Clean the Surfaces
- Use a degreaser or cabinet cleaner to remove built-up grease, dirt, and grime.
- Pay extra attention to areas near handles and edges.
- Let the surfaces dry completely.
Step 4: Sand the Cabinets
- Sand all surfaces, including doors, panels, and fixed pieces, to remove the existing finish and create a texture for the primer to adhere to.
- Use medium-grit sandpaper first, followed by fine-grit sandpaper for a smoother finish.
- Wipe away all dust with a tack cloth or microfiber cloth.
Step 5: Apply Wood Grain Filler (Optional)
- To achieve a smooth finish, especially on oak’s textured grain, apply a wood grain filler to all surfaces.
- Use a scraper or putty knife to spread the filler evenly.
- Allow it to dry completely, then sand it smooth with fine-grit sandpaper.
Step 6: Prime the Cabinets
- Apply a stain-blocking or shellac-based primer to all surfaces to seal the wood and prevent tannins from bleeding through the paint.
- For panels and fixed pieces, use a fine-finish roller to apply primer evenly.
- For painting cabinet doors, an airless sprayer is recommended to achieve a smooth, factory-like finish.
- Let the primer dry as per the manufacturer’s instructions.
Step 7: Sand the Primer
- Lightly sand the primed surfaces to remove imperfections and create a smooth base for the paint.
- Clean away sanding dust with a tack cloth.
Step 8: Paint the Cabinets
- Panels and Fixed Pieces: Use a fine-finish roller to paint the panels and fixed cabinet pieces. Rollers provide smooth, even coverage on flat surfaces.
- Cabinet Doors: Spray the cabinet doors with an airless sprayer for a professional-quality finish. The sprayer ensures a streak-free and smooth application that is difficult to achieve with a roller or brush.
- Apply thin, even coats of paint, letting each coat dry fully before applying the next.
- Use a paintbrush for touch-ups or tight areas.
Step 9: Reassemble the Cabinets
- Once the paint is fully cured, reattach the doors, drawers, and hardware.
- Use the labels to ensure everything goes back to its original position.
Tips for Best Results
- Invest in Quality Tools: Using high-quality rollers and sprayers will improve the overall finish and durability of the paint job.
- Work in a Controlled Environment: Paint in a dust-free, well-ventilated area to avoid imperfections.
- Allow Adequate Drying Time: Be patient and let the paint cure fully between coats and before reassembling.
- Consider Hiring a Professional: Professionals are equipped with advanced tools and techniques, ensuring a flawless finish.
Painting oak wood cabinets is a rewarding project that can completely transform the look of your kitchen or bathroom. By using a fine-finish roller for panels and fixed pieces and an airless sprayer for doors, you can achieve a polished, professional result. Whether you take a DIY approach or hire a professional, painted oak cabinets can breathe new life into your space and elevate your home’s aesthetic.
For the best results, consider reaching out to a professional cabinet painting service to ensure a smooth and durable finish.
Looking to have your oak cabinets painted? Contact us today for your easy online cabinet painting quote – Click Here
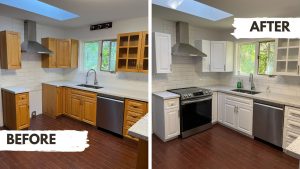
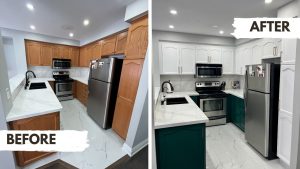
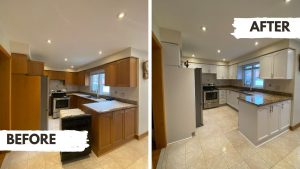
Painting Oak Cabinets Before & After Pictures


Looking to have your oak cabinets painted? Contact us today for your easy online cabinet painting quote – Click Here
TESTIMONIALS
I was extremely pleased with the services I received. Frank & his team at paint my cabinets were great! Trustworthy, reliable and professional! I would highly recommend this company and intend to use them again in the future!
Rose Erman
These guys were great! They quoted me at an unbelievable affordable price and did an amazing job! They were on time, clean, courteous, and professional. I highly recommend this company to anyone looking for a cabinet painter.
Lilian Melo
They did an awesome job. Fast, friendly, neat, cleaned-up well, and at a fair price. I'd highly recommend them.
Braeden Hay


